

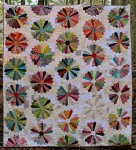
The idea was to use 16 different strips and path them together into colourful blocks.

But if you look closely, you can see that there are 4 squares that are not from the Punctuation range, they are from an older Moda range called Breath of Avignon. When I sat back and looked at the colours, I decided I wanted more solids.
So in a bid to document a bit more what I am doing, here was my process:
1. Take 16 1/2 strips of different colours and sewed them into blocks of 4, use the full strip if you want it to be a larger quilt.


So in a bid to document a bit more what I am doing, here was my process:
1. Take 16 1/2 strips of different colours and sewed them into blocks of 4, use the full strip if you want it to be a larger quilt.

2. Pressed them out and then with my rotary and ruler cut 2.5 inch strips.

3. Once you have your different strips cut, then sew them together. For my quilt, I mixed up the order a bit in each block. But for the purpose of this tutorial, I am not going to mix the colours up.


4. Once you have your 9 or more blocks, start to add the sashing. I cut a length of Kona Solid Snow at 2.5 inches and then sewed each block to it, pressed it with the iron and THEN cut the individual blocks. In the end I had a stack of blocks that looked like thi. 


5. Trim each of your blocks so that they are nice and straight using your ruler and rotary cutter and start assembling the rows of patchwork. Adding a sash to the top of the row so that you have three rows with top and side sashing. The bottom row gets a bottom sash. If you complete each row at a time, the off cut from the large horizontal sash, should be enough to do one of the vertical sashes.

6. Once you have sewn the main part of the quilt together to make it bigger you can add a few more rows of sashing. I am thinking of doing something different and adding different colours to border my baby quilt from the Punctuation range. What do you think?

7. Once you have finished the top, then it is time to baste to batting and a backing colour and then bind. I am thinking of doing some patchwork binding from the left overs, so that it isn't the same colour all around, but patches of the colours that are inside. I am not sure yet. More details later!
What do you think?
Has this tutorial been handy?
Please let me know if my instructions are clear!
What do you think?
Has this tutorial been handy?
Please let me know if my instructions are clear!


16 comments:
Fab tutorial, thanks Ms. Kaos!
this is about the cutest baby quilt I've seen in a long time. About what size is the top? About 40" x 40"? 101 cm?
I LOVE this sweet quilt! Your instructions are very clear. Thank you soo much!
Great tutorial. Thanks.
this looks to be about 32 X 32... very cute quilt and should go together rather quickly too... thanks for sharing
looks to be about 32 x 32 nice size... thanks for the great directions and for sharing
35I like this because it is nice and simple, and you can create a lot of different quilts with this by changing the colors around. You can just take strips and assemble them at random, or plan them out; go monochromatic or lots of contrast. It looks like it goes together really fast by utilizing the jelly roll strips, which is great for those of us doing Project Linus or other quilts for charitable groups. Thanks!
IN THE FIST PART (THE IDEA WAS ..... TO PATH THEM) (IT IS PUT OR PATCH THEM.) AND IN THE PICTURE UNDER STEP 1., IT SHOWS WIDTH AS 2.3 NOT 2.5! BUT I CAN FIGURE IT OUT. ALSO YOU USE THE NON AMERICAN SPELLING OF COLOUR NOT COLOR. THANKS FOR THE TUTORIAL.
IN FIRST PART (PATH THEM TOGETHER) SHOULD BE PUT OR PATCH THEM.
IN PICTURE UNDER STEP 1., WIDTH IS 2.3 INSTEAD 2.5.
THANKS FOR THE TUTORIAL.
How long is 1/2 of a jelly roll in case I just want to use my own material?
Very pretty quilt. I really like making binding from the different fabrics in the quilt. I do that very often and am always pleased with the results.
Thank you for your well thought-out instructions!
Harriet
It would be helpful if you could add the size of the quilt, the yardage needed for backing.
THIS IS PERFECT FOR MY FIRST GREAT GRANDDAUGHTER DUE IN MARCH. THANK YOU.
Wanted to THANK YOU for the direct and to the point tutorial! I can follow it and it makes an impressive quilt 💕 !Im going to teach a few of my clients to quilt for a life skills class level 2 , they are very excited to learn ! This is terrific !
Thank you for this awesome tutorial! Beautiful quilt. I started mind already! Thanks for taking the time to put this tutorial together!!
Shelly.
This so cute! As a first time quilter, I loved the idea. Your directions are so easy to follow. Thanks for posting this.
Post a Comment